Thursday, April 19, 2018

Sticky Note!

Hello Scrapping Cottage Friends!

It is Pam creating with you today!
Thanks for taking time to stop by today!  We have a brand new release of Llama & Botanical dies available in the online store.  And the dies are currently on sale for a limited time at 25% off the retail price.

The new dies have a couple of super cute Llama images as well as cactus and other succulents.  And don't miss the sweet hummingbird and garden bird too!  This new release is so versatile!  They can be used for all kinds of cards and other projects!

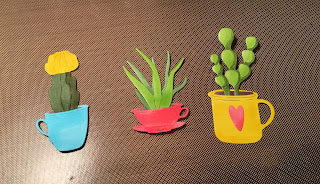
Now let's get on with today's project!  I chose to use the little Teacup Garden die and they are just so cute! In fact I just love the whole release so don't miss out!

Design Steps:
 1.  Using the Teacup Garden die cut out all of the pieces in white.

 2.  Color the pieces using copic makers
3.  Assemble the teacups with the succulents glued inside of the cups
 4.  Use an A2 white card base cut a slightly smaller piece of coral card stock and then an even slightly smaller piece of cactus DP
 5.  Using the Cross Stitched Circle set cut out 3 white circles and glue to the card as shown
6.  Pop up the teacups on top of the circles and add the sentiment

Cottage Cutz Products


As always thanks so much for stopping by and make sure you take some time to get crafty!!
Blessings
Pam

Wednesday, April 18, 2018

Love Bunnies


Hey Everyone. Sherry here from CPR - Craft, Pray, Repeat on YouTube. This is my last video as a guest designer for the Scrapping Cottage. I would like to thank Joanne, the owner, for this amazing opportunity and Mary, the DT coordinator for all the help she gave me making sure that my videos were up correctly and understanding when I messed up. It has been a privilege to be a part of this amazing team.
Here is my video for today and I hope that you really like it. It's turned out to be one of my absolute favorite cards. Click on the photo below to watch the video.


Remember to practice your CPR - Craft Pray Repeat. Thanks for visiting me today and happy crafting.
God Bless,
Sherry

Tuesday, April 17, 2018

Jars of jam

Hi, Janja here!

Nothing can be compared to homemade jams. In the month of May, when the first strawberries are mature, I begin to prepare our jams.
I like how my home smells when I cook fruit. I like the taste and beautiful colors.


I used cute stitched jars on today's first card and filled them with strawberry jam.


Supplies:
- Cottagecutz dies: Stitched Jars, Kitchen Chef (Chef hat), Stitched Sewing Notions (hand made label), Springtime Strawberries, Nested Stitched Scallop Oval Set, Oval Set, Stitched Wide Oval Frame Set
- white card base: 5.3 x 5.3" (13,5 x 13,5 cm, folded
- patterned paper: 5 x 5" (12,7 x 12,7 cm)
- white cardstock
- Memento inks: Lady Bug, Rhubarb Stalk, Dandelion, Peart Tart, Bamboo Leaves
- white pen
- glue, double-sided adhesive tape, self-adhesive pads

Cut out all pieces, and color them with ink pads. I used the stamp for sentiment. For oval cutouts use the largest dies from the three basic oval sets.
When we have everything ready, we begin with gluing.


A card with a glass of homemade jam can also be a nice gift. 


Nothing is better than one afternoon in a company of good friends and a cup of coffee. 


Supplies:
- white card base: 4.25 x 53.5" (10,7 x 13,9 cm, folded
- kraft cardstock: 3.74 x 5" (9,5 x 12,6 cm)
- watercolor paper 
- Distress refill Brushed Courduroy
- Distress inks: Antique Linen, Spiced Marmalade, Wild Honey, Peeled Paint, Forest Moss
- watercolor brush

Cut out a rectangle from watercolor paper, and add drops with a brush on it. It does not matter if a few drops are spilled. This is the purpose of this background. 
In the middle we add some nice phrase about coffee and friends. 
Cut out the tray and cups and color them.


Completed card.


I would like to remind you that the new "Llamas & Botanical" release is available for 25% less. 

Thank you for coming over. Have a nice day. 


Monday, April 16, 2018

Potted Cactus

Hi, Lois here with my Monday post.  My card today uses part of one of the dies from the CottageCutz Llama and Botanicals release, which are currently 25% off.  You might want to check them out.  The die I used, Potted Cactus, actually has two plants included in the set, but I'm using only one of them.

I keep some small notebooks with layouts from Splitcoaststampers Sketch Challenges.  When I'm stuck for a layout, I pull out one of the notebooks and try to find something that will inspire me.  This is the case today.  I found this layout, which dates back to a 2007 challenge.


This is my card, based on that sketch.


To start my card I cut out the pieces with the die.   I'm not going to use all the pieces that were cut, so I just chose the pieces for the right-hand cactus on the packaging.  I'll save the other pieces for another card.


Using Copic markers, I colored the die-cut pieces and assembled my cactus, succulent and pot.


The paper I used for the card is as follows:

Yellow cardstock - 8 1/2" x 5 1/2", scored at 4 1/4"
Rust cardstock - 4" x 5 1/4" and 2 3/8" x 3 1/8"
Cream cardstock - 2 1/4" x 3"
Rust checkered patterned paper - 3 3/8" x 3 7/8"
Yellow plaid patterned paper - 1 5/8" x 3 7/8"


I glued the two pieces of patterned paper onto the rust cardstock, using the sketch for positioning.  I sponged a bit of Ranger Rusty Hinge ink onto the small cream piece of cardstock, adhered it to the small rust piece of cardstock and glued on the cactus.


I then placed some foam pop-dots behind the panel and placed it on the card.  I then added three enamel dot stickers, and I was finished.

Here again is my card:


The CottageCutz die used on this card:

http://www.scrappingcottage.com/cottagecutzpottedcactus.aspx