Showing posts with label pumpkin patch. Show all posts

Thursday, November 04, 2010

Boo!

First, I apologize for the funky coloring in my scan - it happens when the lumpy parts stitch into the non-lumpy parts so I can't really do anything about that aside from not making lumpy projects, which is not going to happen. I love me some foam tape! LOL And now, on to this week's project.

This week I'm sharing a layout of my simple Halloween pumpkin. I like to do something different with my pumpkin every year, and this time, I decided to paint my pumpkin instead of carving it. I added black vinyl accents and a green wire to the stem, and there you have it. I love it.

I used the Cottage Cutz pumpkin trio and stamp set along with leaves and vine from the pumpkin patch die for my 3D embellishment.


Here I've used the scallop/dot edger and bling accents.

and for a little something extra, I used the bitsy little spider from the Cottage Cutz spooky fence to "hang" from the ribbon. I heat embossed him with clear powder to give him more texture and dimension after I added white to his eyes. He's barely visible in the photo of the whole layout, but he's there. :)

Have you started scrapping your Halloween pics yet? Thanksgiving is just around the corner!


Thursday, October 28, 2010

Happy Halloween!

I hope you're staying warm where you are. With fall officially here, the temps have dropped considerably here in the high desert of Eastern Washington and I'm even wearing slippers in the house! GASP! It may not sound like a big deal, but I'm a year-round barefoot kinda gal and my feet have been freezing the past few days on these hardwood floors! But I digress... the reason for my fall lead-in is this card :)

I've used the pumpkin trio, minus their face stamps, for this glittery fall card. For the pretty corner flourishes, I used the vine stamp that comes with the trio die.


I added vines and leaves from the pumpkin patch die and the grass from the spooky fence. Cute, huh!


For my final project this week, another treat container! If I had a whole house for a storage unit, I could fill it with containers. I'm a container-holic {Nikki - no comment from you, hoarder-watcher! LOL) K, so anyway, this container, as you can see, is Queen and Co.

I took it apart to make a template...
...and traced it onto my double-sided paper
On the inside, I made my score lines and marked where my tabs and slots would be.
Fold, adhere and punch holes in the sides for my ribbon handle, and now I'm ready to embellish.
The adorable little witch on her broom makes a super cute little treat sweetie, doesn't she!
Add stickles - cuz everyone loves bling, even witches, don't you know....

...and a tag for giving. Here I used one of the pumpkins from the pumpkin trio and slipped the ribbon handle through one of the slots.

You still have a few days yet till Halloween if you want to make treat bags. You can use most any container as a template to make your own, or just grab a lunch bag and start embellishing! Pretty much anything will work....as long as it's got candy in it, right!? :) Happy Halloween!

Thursday, September 30, 2010

I'm a nut for the nutty squirrel!

I don't know about you, but when I saw the nutty squirrel, I laughed out loud and had to have him!! He's so nutty....just like me. We were meant to be together! LOL I put this card together just waiting for him to appear in my mailbox so I could add him to the front of the card, and he didn't disappoint. I also used the loopy edge border, in keeping with the loopy/nutty theme, of course! Isn't he a nutter!?? For extra texture, I've used fabric paints on the heart, acorn and oval frame behind Mr. Nutter. These papers are Tree Love by Nikki Sivils. Cute, huh.
Inside message:
I love the Cottage Cutz fall collection and this hay wagon is another of my faves. I've used the patch of grass from the scarecrows die also.

You can never go wrong with stickles. Stickles always add a little pizzazz!
For the inside message, I again used the nutty squirrel. He's so cute! As well as the sign from the pumpkin patch die and the grass from the scarecrows die.
The letters for the message on the sign are also from the pumpkin patch die. The "w" is just the "m" turned upside down.
Hope you're having a great week!


Thursday, September 16, 2010

Let's go to the pumpkin patch!

Nothing says fall like rows and rows and pumpkins, ready to be chosen by precious little hands that can barely pick them up. Joe and Regan had a blast with Aunt Cyndi at the pumpkin patch last fall. I couldn't resist doing another layout with the adorable Cottage Cutz pumpkin patch and crows dies. Below the large scallop border, I also used the scallop three edger.


Love the Eerie Halloween paper collection by Basic Grey. My favorite Halloween color combination is purple and green.


Once again, I've used the letters that come on the die (pumpkin patch) to spell different words for my sign. Amazing how many words you can get from those few letters. This time, I cut the sign from cork paper which makes very realistic looking wood planks.


Layered pumpkins and sunflower vines make a fun pumpkin patch growing below and around the sign.


Thanks for looking. And if you haven't picked up this die yet, get on it. It's so versatile and just plain fun!!


Thursday, September 09, 2010

Fall is in the air....and on my projects, too!

Fall is here - well it is at my house anyway. :) I couldn't resist scrapping Regan's pumpkin pics with these super cute fall dies. I've used the Cottage Cutz pumpkin patch -- adorable!, crow, and loopy edger on my layout.


Tons of pieces to this shape but what a fun one to put together. I love that the letters for the sign come on the die so there is no guessing if they'll fit, they're perfect!


Love the crow and cut his bandana to match the accent paper.


I used a tiny piece of the loopy edger to make the vine on the pumpkin and combined the leaves and pumpkins to make my date tag.


For this halloween card I used the pumpkin patch die in a different way to show its versatility. Everything is popped with foam tape cuz foam tape is one of my favorite things in the whole world and I love it. :)

I wrote the letters on the sign with a marker and for the RIP letters, I used the P, I, and K. I cut an extra P and placed it over the K to make the R. The tombstone is actually part of the beach chairs die. The inside cut out from the back of the chair made the perfect headstone! The bat and pumpkin I had in my stash from a pack of Halloween Favorite Findings I've had forever.
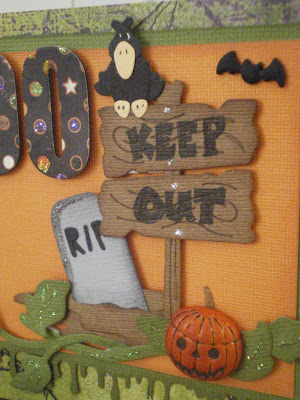


To make the trailing vines along the bottom of the keep out sign I used the stem and leaves from the sunflowers on the pumpkin patch die, and I added stickles because stickles are cool on pretty much anything and everything! :) The drippy goo along the bottom is a Martha Stewart border punch.